


On this page
A manual vacuum is useful because it goes where you steer it. It can pause over one sediment pile, trace the cove, and work beside a ladder without waiting for a robot to choose the same route.
The head does not create suction by itself. It depends on an unbroken column of water through the hose, a sealed skimmer connection, enough pump flow, and a filter path set up for the debris. Most poor results begin in that chain, not at the vacuum head.
This guide covers a common above-ground arrangement that connects through a wall skimmer. Your skimmer manual controls the exact adapter, basket and weir position, valve setting, and pump state. Identify the model before taking anything apart.
Gather the Matching Parts
Use:
- a weighted vacuum head labeled safe for vinyl;
- a telescopic pole;
- vacuum hose long enough to reach the farthest floor point without pulling tight;
- the vacuum plate or hose adapter made for the skimmer;
- a leaf rake for material too large for the hose; and
- the manuals for the skimmer, pump, and filter valve.
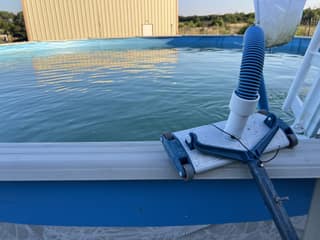
Inspect the head and hose. A split cuff draws air; a kink restricts flow; a seized wheel or exposed fastener can mark the liner. The hose should fit both connections without tape, wedges, or force.
Step 1: Remove Debris That Can Block the Vacuum
Take out sticks, acorns, large leaves, and heavy clumps first. They can lodge in the head or hose, and a sharp piece dragged beneath the vacuum can puncture vinyl.
A deep-bag leaf rake carries the bulk load better than a suction hose. If the water is too cloudy to see the entire floor, stay out of the pool and work from the deck. Clear water is a safety requirement, not just a cleaning goal.
Step 2: Choose Filter or Waste Before Starting
For routine dust and small debris, the FILTER position sends vacuumed water through the main filter and back to the pool.
WASTE, on a system that has it, bypasses the filter and discharges the water. It may be appropriate for a heavy settled load or material that the product instructions say must not enter the filter. The water level can fall quickly, and the discharge must have a legal, safe destination. Cartridge filters commonly have no WASTE position.
Read the filter-valve manual before choosing. Stop the pump before moving a multiport handle, and stop it again before returning the valve to its normal position. Never park the handle between labeled settings while operating.
Step 3: Check the Water Level and Flow Path
The skimmer needs the operating water level specified by its manufacturer. Too little water lets the skimmer pull air as vacuuming lowers the level or concentrates suction.
Before connecting the hose:
- keep swimmers out while the hose and vacuum equipment are in the pool;
- note the clean filter pressure or normal return flow;
- empty any basket the vacuum setup depends on;
- confirm required valves are open; and
- disable an automatic schedule before any step that requires shutdown.
Do not open the pump strainer or filter while the system is pressurized. Follow that equipment's shutdown, isolation, and air-relief procedure.
Step 4: Assemble and Submerge the Head
Lock the head onto the pole and seat one hose cuff on its swivel fitting. A rotating fitting keeps the corrugated hose from steering the head as sharply.
Lower the head gently until it rests flat. Do not drop a weighted head onto the liner. Keep the free hose cuff at the surface where it can be primed and moved to the skimmer.
Extend only the pole length needed for the current pass. Excess flex makes the head lift when the direction changes.
Step 5: Fill the Hose Until the Air Is Gone
Air in the hose interrupts the water column the pump needs. It causes weak suction, bubbling returns, or a lost pump prime.
Prime the hose with one of the methods allowed by the equipment maker:
- lower the hose into the pool section by section so water replaces the air; or
- hold the free cuff at a return inlet until water drives bubbles out through the submerged head.
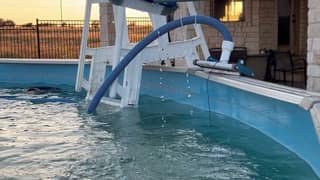
With return-jet priming, wait until bubbles stop leaving the submerged head. With section-by-section priming, continue until air stops escaping the open cuff and water reaches it. Keep both the head and free cuff below the surface while moving the cuff toward the skimmer so the hose does not drain and refill with air.
Step 6: Connect Through the Skimmer's Approved Adapter
Common designs use either a plate over the skimmer basket or a dedicated hose adapter. The basket, weir, lid, and pump are not placed the same way on every design.
There is also no universal pump-on or pump-off connection rule. Hayward's Dyna-Skim instructions, for example, keep the basket in place and use pump suction to seat the model-specific Skim-Vac after the hose is filled. Other skimmer and pump manuals may require shutdown for the connection.
Follow the installed skimmer's sequence. Keep hands out of an exposed suction port, do not bypass a required basket, and do not jam a hose cuff into an outlet that needs an adapter. A poor fit can draw air or damage the skimmer.
If the instructions call for the pump to be off, prevent automatic restart, complete the connection, restore the required covers and valves, then start the system by its normal priming procedure.
Step 7: Verify Suction, Then Move Slowly
Before crossing the floor, confirm that the head stays down, debris moves beneath it, the pump holds prime, and the returns are not sending out a continuing stream of air.
Stop and correct the setup if the hose collapses, the pump becomes unusually loud, suction fades, air persists at the returns, or filter pressure leaves the equipment maker's operating range. Continuing with poor flow does not clean the floor and can starve the pump.
Use Overlapping Passes
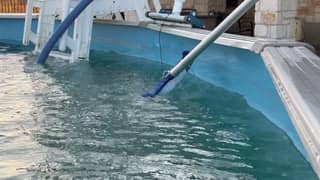
Start at one side and make straight passes with a small overlap. Move much slower than a household vacuum. If a cloud rolls behind the head, pause long enough for it to settle and reduce your speed.
Guide the head across low spots, the cove, seams, and the ladder area without grinding over wrinkles. Brush dirt out of an edge with the technique in the vinyl-liner brushing guide instead of forcing a wide vacuum head into it.

Feed enough hose for the head to stay flat, but keep loops clear of the ladder and skimmer. Pulling against a tight hose can lift one side of the head and break suction at the floor.
Step 8: Return Every Part to Normal Operation
Use the removal sequence in the skimmer manual. Where shutdown is required, stop the pump and prevent a scheduled restart before breaking the vacuum connection.
Then:
- Remove the hose, plate, or adapter.
- Reinstall the basket, weir, lid, plugs, and valve positions used for normal skimming.
- Empty baskets and clean or backwash the filter when its pressure or flow calls for service.
- Put a multiport valve back on FILTER with the pump off.
- Restart with the pump and filter maker's priming and air-relief procedure.
- Check normal skimmer flow, return flow, filter pressure, and the equipment area for leaks.
Rinse the head and hose, drain them, and store the hose in broad coils out of direct sun. Tight kinks can become flow restrictions on the next use.
If Suction Drops, Check the System in Order
Do not compensate by pressing the head harder into the floor. Stop the pump when the manual requires shutdown, then work from the pool toward the equipment:
- Vacuum head: Remove a leaf or object covering the intake.
- Hose: Look for trapped air, a collapsed section, a split, or a loose cuff.
- Skimmer connection: Reseat the correct plate or adapter and check its sealing surface.
- Water level: Restore the required skimmer level if it has fallen.
- Baskets: Empty the skimmer and pump baskets by their shutdown procedures.
- Filter: Compare pressure and return flow with the clean baseline; service it as its manual directs.
- Valves: Confirm every suction and return valve is in the documented vacuum position.
Persistent air at the returns points toward an air leak or incomplete hose prime. A hose that flattens can mean a blockage, too much restriction, or a hose not rated for the suction. A vacuum that begins well and fades as dirt is collected often indicates a loading basket or filter.
Use a Manual Vacuum for Control, Not Every Cleaning Cycle
A robotic cleaner can take over broad floor coverage without using the pool pump or skimmer. The manual vacuum still earns its storage space for one sediment patch, the ladder area, a route the robot avoids, and approved vacuum-to-waste work.
The robotic-cleaner limits guide separates those jobs. For routine manual vacuuming, four details decide the result: a water-filled hose, the correct skimmer connection, the documented filter path, and passes slow enough to keep sediment under the head.
Frequently asked questions
How do I connect a manual pool vacuum to an above-ground pool?
Most connect a completely water-filled hose to a model-specific vacuum plate or adapter at the wall skimmer. Follow the skimmer manual for the basket, weir, cover, adapter, valve positions, and pump state; these details are not the same on every skimmer.
Should the pump be on while I connect the vacuum hose?
Use the procedure for the installed skimmer. Some Skim-Vac instructions seat the plate with the pump operating, while other systems call for shutdown. Prime the hose first, keep hands away from an open suction port, and always stop the pump before moving a multiport valve or opening circulation equipment.
Why does my pool vacuum have no suction?
Check for air left in the hose, a loose cuff or adapter, low pool water, a full basket, a loaded filter, a blocked head, or an incorrect valve position. Stop the system according to its manual before opening a basket, filter, or connection.
Should I vacuum an above-ground pool on filter or waste?
Use FILTER for ordinary debris when the filter can retain it. WASTE bypasses compatible multiport filters and lowers the pool level, so reserve it for material the equipment and discharge plan can handle. Many cartridge systems have no WASTE setting.
Do I have to prime the vacuum hose?
Yes. With return-jet priming, wait until bubbles stop leaving the submerged head. With section-by-section submersion, continue until air stops escaping the open cuff and water reaches it. A large air pocket can weaken suction or make the pump lose prime.


